Vinyl Siding Installation


Getting Started

Materials

Sheathing/Backerboard

Vinyl siding should be applied over a sheathing that provides a smooth, flat surface. Consult local building codes for sheathing requirements. Vinyl siding must never be applied directly to studs without sheathing. As an alternative, installation of specific types of drop-in contoured foam underlayments for various styles of vinyl siding are available. Some manufacturers of vinyl siding do not recommend the use of drop-in backers with certain vinyl siding configurations.

Sheathing Nailability

Vinyl siding can be installed over common wood sheathings such as plywood, oriented strand board (OSB), or other materials (e.g., foam plastic insulating sheathing). The thickness of wood sheathing counts toward the total thickness that the fasteners must penetrate into nailable material, usually 1 1/4” (32mm). But foam plastic sheathing does not contribute toward holding the fastener, so its thickness cannot be counted toward the total. In this case, the fastener would have to be long enough to penetrate through the sheathing and 1 1/4” (32mm) into the wood framing.

Water-resistive Barrier

Vinyl siding should be installed over a continuous water-resistive barrier to stop the intrusion of incidental water. Refer to Important Notes for more information on water-resistive barriers. Check your local building code for requirements in your geographic area.

Flashing

Code-compliant flashing should be integrated with the water-resistive barrier and applied around windows, doors, and other openings. Flashing should also be applied to inside and outside corners, and the intersection of walls and roofing to prevent water infiltration.
How to Measure

Estimating Required Materials

  • All houses can be broken down into shapes of rectangles or triangles, or a combination of both.
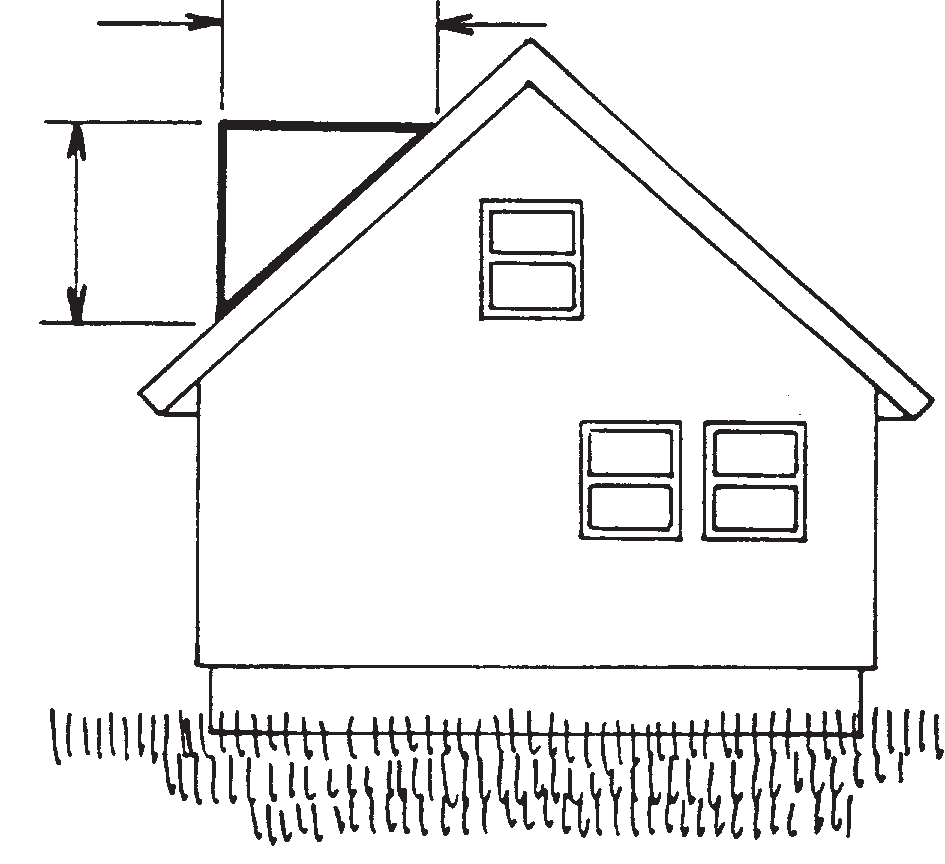
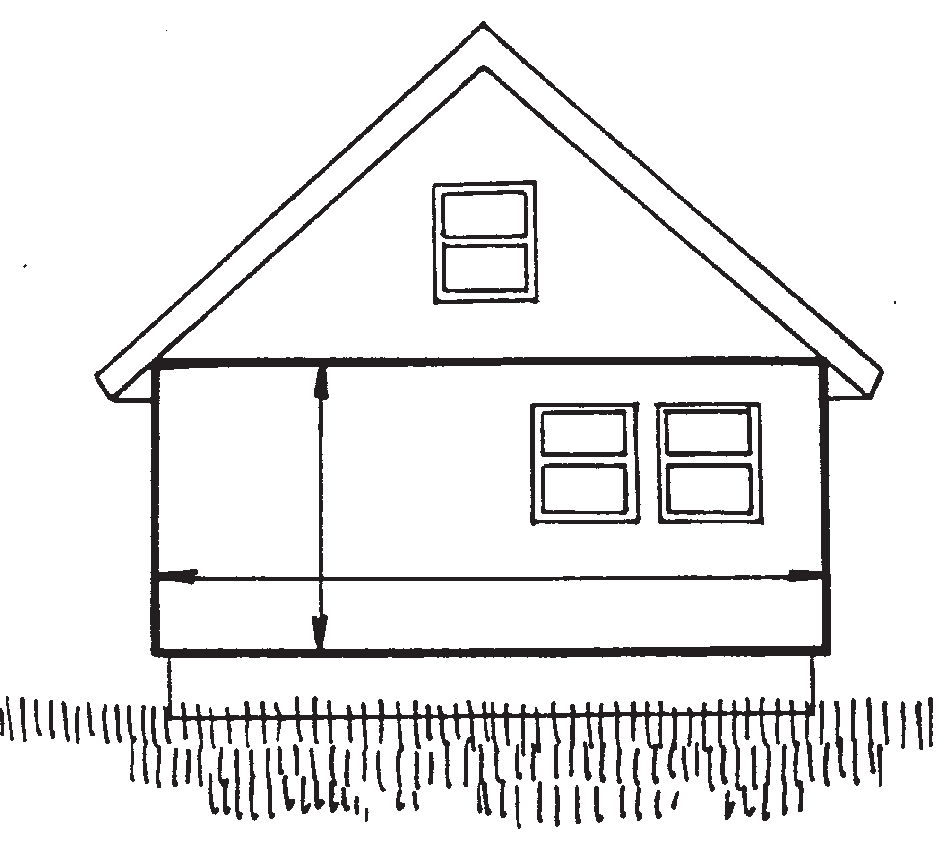
  • The area to be sided can be determined by measuring the height and width of the house, including windows (Fig. 11).
  • Total all of the measurements for the areas to be sided. Windows and doors are not usually deducted. Including them will provide an allowance factor for waste. If the windows and doors are extremely large (such as a garage or sliding glass doors), some deductions can be made (Fig. 12-14).
  • To estimate the amount of starter strip required, measure the linear feet around the entire base of the house.
  • Add siding to all material estimates to allow for waste, depending on the pitch of the roof and other house-specific factors.
  • To estimate the total pounds of fasteners required, multiply the total square feet of siding by 0.005 for aluminum nails and 0.01 for roofing nails, staples, and screws.
  • Every 100 square feet (9.29 square meters) is called a “square” for ordering purposes.
NOTE: The amount of siding needed/waste generated for a vertical siding job will be determined by the height of the wall versus the length of the panels.

Height (feet/meters)
x width (feet/meters)
= (square feet/meters)

line drawing of house with arrows showing how to measure side wall
Figure 11. Wall Areas

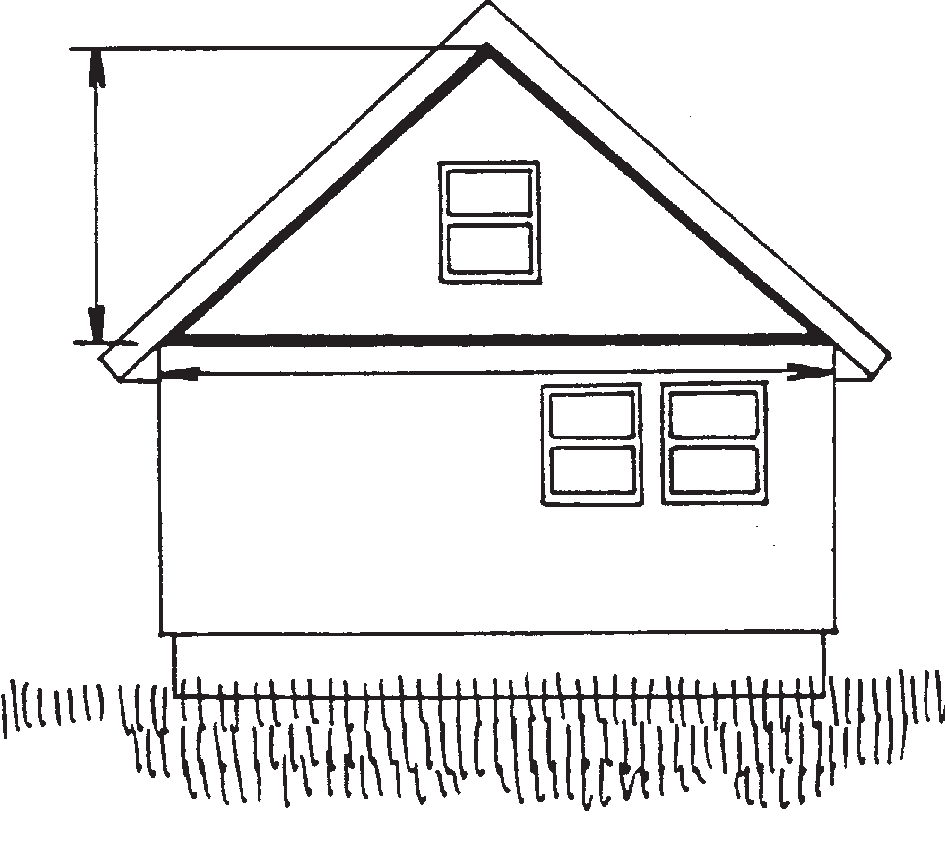
½ Height (feet/meters)
x width (feet/meters)
= (square feet/meters)

line drawing of house with arrows showing how to measure side wall gable area
Figure 12. Gable Areas
  • Every 100 square feet (9.29 square meters) is called a square for ordering purposes.

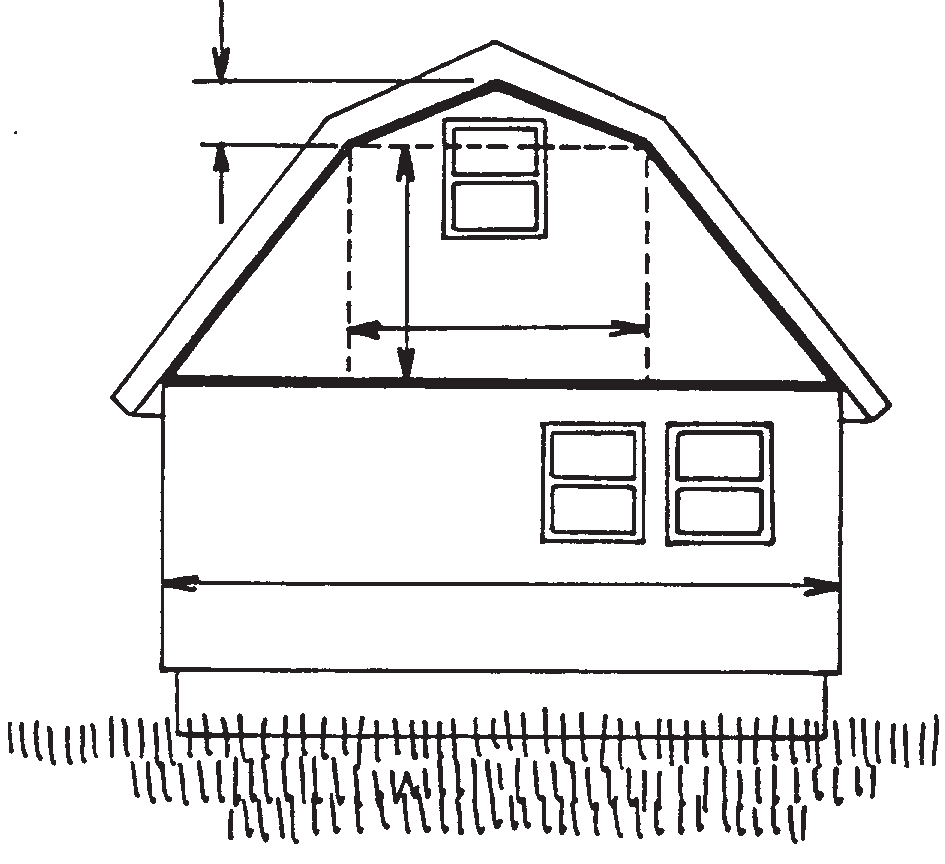
½ (A + B) x C + ½ B x D
= total area of gable (square feet/meters)

line drawing of house with arrows showing how to measure gable area of barn style roof
Figure 13. Gable Roof House

½ Height (feet/meters)
x width (feet/meters)
= (square feet/meters)

line drawing of house with arrows showing how to measure dormer area
Figure 14. Dormer Areas


Estimating Worksheet

Download the estimating worksheet here.


Fastener Choices

Use aluminum, galvanized steel, or other corrosion-resistant nails, staples, or screws when installing vinyl siding. Aluminum trim pieces require aluminum or stainless steel fasteners. All fasteners must be able to penetrate a minimum of 1 1/4” (32mm) into nailable material, such as wood sheathing and framing (Fig. 15).

When the fastener must penetrate through a non-nailable material such as foam sheathing, the thickness of that material does not count toward the total. In such cases, the fastener will need to be long enough to penetrate through the non-nailable material and then 1 1/4” (32mm) into wood framing or other nailable material. (Review the siding manufacturer’s instructions and your local building codes for variations that may apply to specific siding or geographic areas.)

Nails

Nail heads should be 5/16” (7.9mm) minimum in diameter. Shank should be 1/8” (3.2mm) in diameter (Fig. 15).

Figure 15.


Fastening Procedure

Vinyl siding can expand and contract 1/2” (12.7mm) or more over a 12’ 6” (3.81m) length during normal, year-round changes in temperature. Whether using a nail, screw, or staple to fasten the siding, the following basic rules must be followed:

  • Make sure the panels are fully locked along the length of the bottom, but do not force them up tight when fastening.
  • Do not drive the head of the fastener tightly against the siding nail hem. Allow approximately 1/32” (0.8mm) clearance (the thickness of a dime) between the fastener head and the vinyl. Tight nailing, screwing, or stapling will cause the vinyl siding to buckle with changes in temperature (Fig. 16).
  • When fastening, start in the center of the panel and work toward the ends.
  • Center the fasteners in the slots to permit expansion and contraction of the siding (Fig. 17).
  • Drive fasteners straight and level to prevent distortion and buckling of the panel (Fig. 18).
  • Space the fasteners a maximum of 16” (406mm) apart for horizontal siding panels, every 12” (305mm) for vertical siding panels, and every 8” to 12” (203mm to 305mm) for accessories. These distances may be increased if the manufacturer permits greater spacing based on wind load testing. Start fastening vertical siding and corner posts in the top of the uppermost slots to hold them in position (Fig. 19). Place all other fasteners in the center of the slots.
  • If a nail slot does not allow centering/securing into a nailable surface, use a nail hole slot punch to extend the slot and allow centering of the fastener.

Figure 16.

Figure 17.

Figure 18.

Figure 19.

Screw Fasteners

Screw fasteners can be used if the screws do not restrict the normal expansion and contraction movement of the vinyl siding panel on the wall. Screws must be centered in the slot with approximately 1/32” (0.8mm) space between the screw head and the vinyl. Screws must be able to penetrate no less than 1 1/4” (32mm) into framing or furring and should be:

  • Size #8, truss head or pan head
  • Corrosion-resistant, self-tapping sheet metal type

Staples

If staples are being used instead of nails or screws, consult your local building codes. The manufacturer may permit the use of staples as an alternative to nails. Be sure to observe any limitations with respect to the wind load design pressure rating when the siding is installed with staples. The staples must (Fig. 20):

  • Not be less than 16-gauge semi-flattened to an elliptical cross- section.
  • Penetrate not less than 1 1/4” (32mm) into framing or furring, or as specified in the manufacturer’s instructions.
  • Be wide enough in the crown to allow free movement of the siding (approximately 1/32” [0.8mm] away from the nailing hem).

Figure 20.

Figure 21.


Cutting the Siding

When cutting vinyl siding or soffit, follow these guidelines:

  • Safety goggles are always recommended for all cutting and nailing operations. As on any construction job, use proper safety equipment and follow safe construction practices.
  • With a circular saw, always install the fine-tooth (plywood) blade backwards on the saw for a smoother, cleaner cut, especially in cold weather (Fig. 21). Cut slowly. Do not attempt to cut materials other than vinyl with a reversed direction saw blade. Caution! Use of a backwards blade on any other materials could be unsafe.
  • With tin snips, avoid closing the blades completely at the end of a stroke for a neater, cleaner cut (Fig. 22).
  • With a utility knife or scoring tool, score the vinyl face up with medium pressure and snap it in half. It is not necessary to cut all the way through the vinyl (Fig. 23).

Figure 22.

Figure 23.


Preparing the Walls

A flat, level wall surface is necessary for proper installation of vinyl siding. Install flashing before starting to apply the siding.

Unless already installed, a water-resistive barrier should be applied to the house prior to installing vinyl siding. Refer to Important Notes for more information on water-resistive barriers. Consult your local building code for requirements in your geographic area.

Make sure that the construction of the wall allows for a total of 1 1/4” (32mm) fastener penetration into wood material. If the wall is covered with foam plastic sheathing, make sure that nails will be long enough to penetrate 1 1/4” (32mm) into the framing behind the foam. Make sure that any furring strips are thick enough to provide this penetration depth, or cover them with wood sheathing to provide the needed depth.

New construction

  • Tip: To reduce the possibility of floor-plate compression, drywall, roofing, or other heavy building materials should be installed or stored throughout the house prior to the installation of vinyl siding. Floor-plate compression can result in buckled siding at the intersection of the floor and the wall.

Re-siding

  • Nail down loose boards of existing siding, and replace any rotten ones (Fig. 24). Do not install vinyl siding over rotting wood.
  • Scrape off loose caulk and re-caulk around windows, doors, and other areas to protect from moisture penetration.
  • Remove all protrusions such as gutters, down-spouts, and light fixtures.
  • Check all walls for evenness and install furring strips where necessary. When installing furring strips, please take appropriate measures to establish a smooth and continuous surface. (Fig. 25).

Figure 24.

Figure 25.

NOTE: In cases where the lower portion of a horizontal siding panel must be trimmed so that it may be installed over steps, porches, etc., the panel should be built out (“furred”) for proper angle and rigidity. Utility trim can be used to seal the cut edge of the panel and then secured to the wall.

Outside and Inside Corner Posts

  • A water-resistive material should be used to flash the inside and outside corners a minimum of 10” (254mm) on each side before installation of the corner posts (Fig. 26).
  • Figure 26.

    NOTE: Depending on the type of construction, vinyl soffit and fascia or the corner posts can be installed first.
  • Inside corner posts can be a single or double J-channel, or a factory-formed inside corner.
  • Place the corner post in position, allowing a 1/4” (6.4mm) gap between the top of the post and the eave or soffit. Position a nail at the top of the upper slot on both sides of the corner post, leaving a gap of approximately 1/32” (0.8mm) between the nail heads and the corner posts. The corner post hangs from these nails. The balance of the nailing should be in the center of the slot, 8” to 12” (203mm to 305mm) apart, again leaving 1/32” (0.8mm) between the nail head and the corner post. This allows for the expansion and contraction to occur at the bottom. The corner post should extend 3/4” (19mm) below the starter strip. Make sure the posts are plumb (i.e., vertically straight) and square to the wall (Fig. 27 and 28). Cut away any exposed nail hems.
  • Figure 27.

    Figure 28.

  • If more than one length of corner post is required, overlap the upper piece over the lower piece by cutting away 1” (25.4mm) of the nailing flange on the top piece. Overlap 3/4” (19mm), allowing 1/4” (6.4mm) for expansion. This method will produce a visible joint between the two posts, but will allow water to flow over the joint, reducing the chance of water in infiltration.
  • Capping a Corner Post

    • Corner posts on homes with a second-story overhang need to be capped by making the cuts shown (Fig. 29). Fold the flaps created over each other as indicated.
    • Drill a 1/8” (3.2mm) hole in the center, through both layers of vinyl, and install a pop rivet to hold them in place. Cut a notch in both layers to allow clearance for the corner.

    Figure 29.


    Starter Strip

    In order for the siding to be installed properly in a level fashion, the starter strip at the bottom of the wall must be level.

    • Determine the lowest point of the wall that will be sided; from that point, measure up 1/4” (6.4mm) less than the width of the starter strip and partially drive a nail at one corner.
    • Attach a chalkline; go to the next corner and pull the line taut.
    • Make sure the line is level by using a line level or a 4’ (1.2m) level.
    • Snap the chalkline and repeat the procedure around the entire house.
    • Optional method to determining the position of the starter strip in new construction and some re-siding applications: Measure down from the soffit at one corner of the house to the top of the foundation and subtract 1/4” (6.4mm) less than the width of the starter strip. Make a mark on the wall and record the measurement. Transfer the measurement to the other corner of the wall. Snap a chalk line in between the corners at the marks. Repeat the procedure around the entire house.
    NOTE: When insulation or backerboard is used, fur the starter strip, if necessary, to accommodate the thickness of the sid- ing. For a vertical siding starter methods, see the section on vertical siding.
    • Using the chalkline as a guide, install the top edge of the starter strip along the chalkline, nailing at 10” (254mm) intervals. Allow space for the corner posts, J-channels, etc.
    • Keep the ends of starter strips at least 1/4” (6.4mm) apart to allow for expansion (Fig. 30).
    • Figure 30.

    • Nail in the center of the starter strip nailing slots.
    • For insulated siding, the starter strip needs to be spaced away from the wall to accommodate the thickness of the backing on the siding. Consult the manufacturer’s instructions for specific materials or techniques.
    NOTE: In certain situations, it may be necessary to use J-channel as a starter strip; remember to drill minimum 3/16” (4.8mm) diameter weep holes no more than 24” (610mm) apart.

    Installation and Maintenance

    Vinyl Siding Installation Manual

    Basic guidelines for vinyl siding installation. (Spanish version and French version also available)
    Read More

    Installation and Maintenance / Technical Information

    How to Properly Install Polymeric Siding and Soffit in Coastal Areas

    Understand the codes and compliance requirements for properly installing polymeric products in high-wind regions with this at-a-glance guide.
    Read More